Serra's Loom AI assistant for Blender brings AI image, video, 3D, animation, and scene-building tools into the Blender viewport. Prompt from within the Loom app and the results will be generated directly in your open Blender scene.
No monthly subscription fees. Pay only for the AI LLM tokens you use.
No monthly subscription fees. Pay only for the AI LLM tokens you use.
Loom is an AI agent for Blender
What Is Loom by Serra and How Does It Work with Blender?
Serra builds productivity tools for animation and VFX professionals. Loom by Serra is an AI assistant for Blender. It consists of a Blender add-on and a chat application where you can prompt and review your AI interactions. The model, rig, image, video, lighting specifications or a whole scene generates straight into the Blender file you already have open.
Loom is a technical assistant that handles the repetitive tasks, maths, nodes and housekeeping, so artists have more time for the parts that need their eye and creative decision making. It doesn’t take the fun part away, it just gets you there faster.
Loom is a technical assistant that handles the repetitive tasks, maths, nodes and housekeeping, so artists have more time for the parts that need their eye and creative decision making. It doesn’t take the fun part away, it just gets you there faster.
Video can’t be displayed
Describe a look and get a proper node network to open up and tweak, instead of starting from a blank node editor.
Build the supporting stuff around your hero, like city blocks, props, abstract shapes or filler objects, so you can put your time into the main model instead.
Shaders and materials
Background assets and set dressing
Names, organises and cleans up objects, collections and materials, so files stay clean as projects grow and are easier to hand over.
Keeping projects tidy
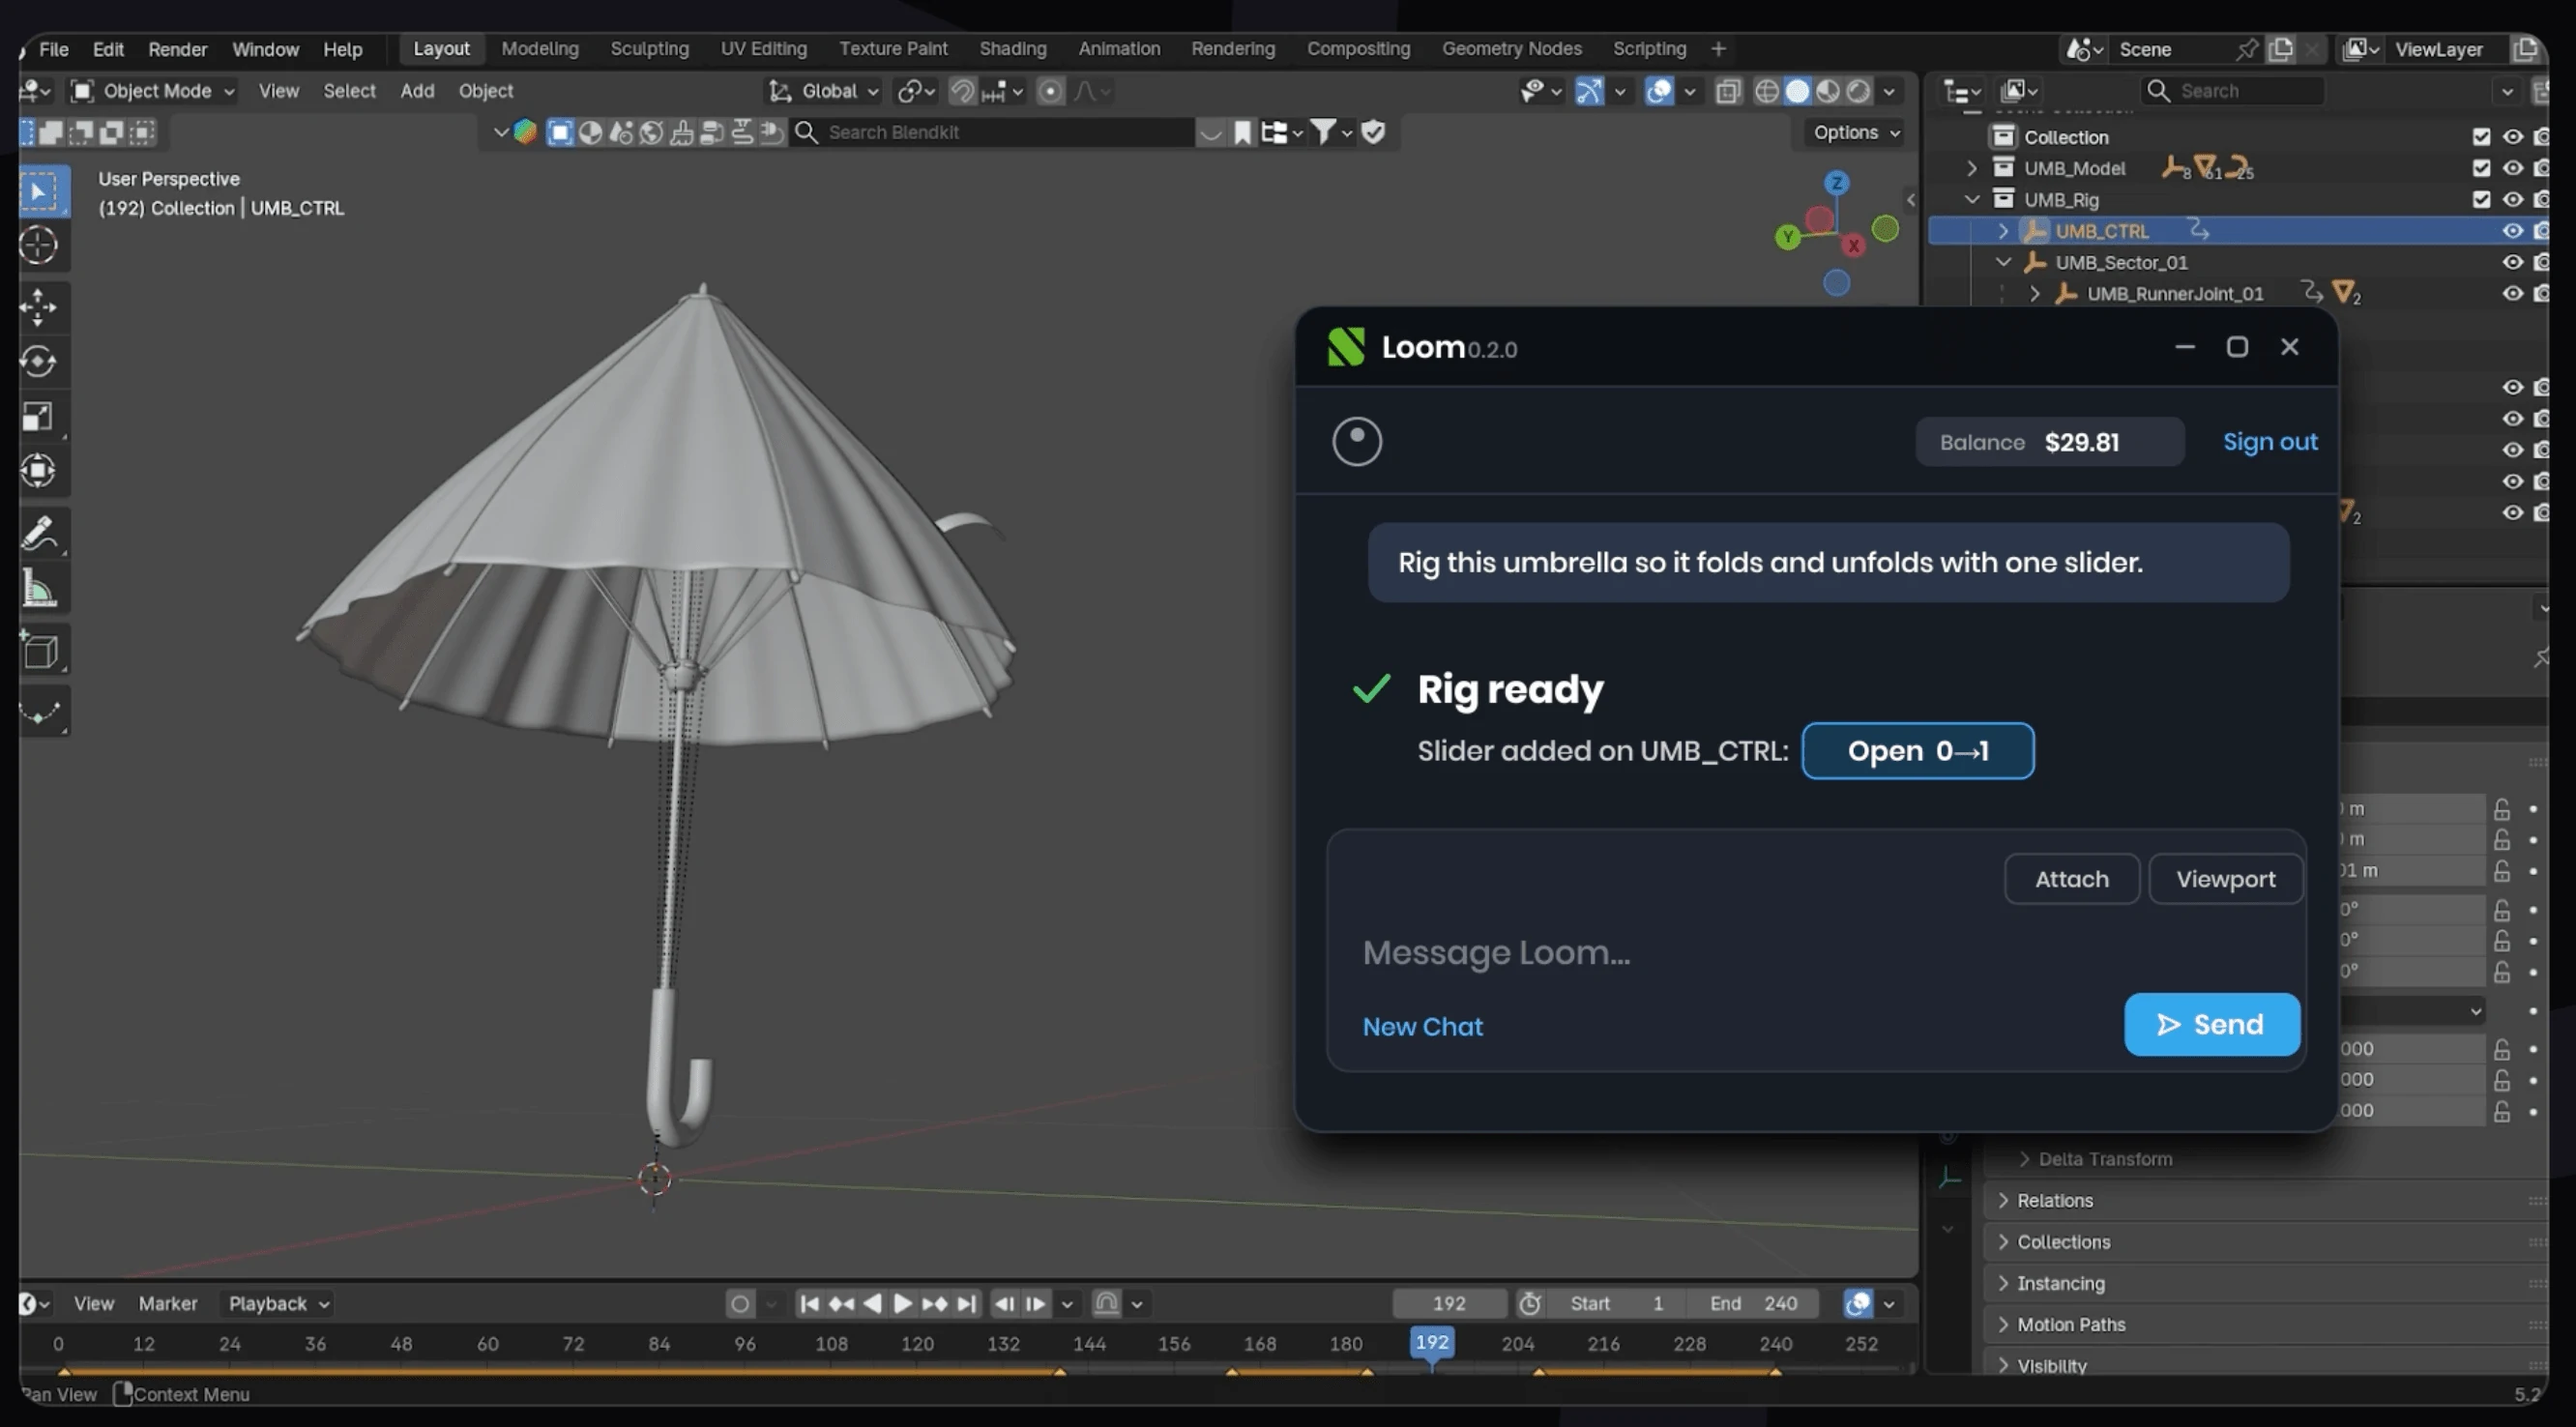
Mathematically accurate rigs like gears, linkages or a coin settling, driven from simple controls. Saves hours of driver setup so you can start animating sooner.
Mechanical rigs with simple controls
Fix messy imported or client models (scale, normals, duplicate vertices, broken materials) or ask why something’s broken, like a slow render or a driver not working, and have Loom find and fix it.
Cleanup and troubleshooting
What the Plugin Does
Procedural scenes without learning complex node systems
Describe what you want and Loom builds it with Geometry Nodes (scattering, arrays, patterns), all still live and editable.
How It Works
Builds and edits your scene. Objects, materials, modifiers, lighting, cameras, animation, rigging. Anything Blender can do, Loom can do for you.
Knows what's there. Every request starts from your current scene, so "move the lamp above the chair" means your lamp and your chair.
Sees what you see. Drop in a reference image, or let Loom take a viewport screenshot to check its own work.
Full Video Workflow: From Blockout to Finished Shot (WIP)
Here's an example of how a finished video comes together, building up in layers.
Step 1: Start with the bare scene.
Scene Builder places the objects, layout, and light, plain geometry standing in for what the final shot will look like.
Step 2: Add a character.
Character Animation drops a rigged character in and animates the move described in plain language.
Step 3: Texture the location.
3D Model or Image fills in the surfaces, materials, and set dressing that was still missing.
Step 4: Generate the finished video
Video renders everything built up so far into the final shot.
How To Use It In Production
1. Previs, Environment Blocking & Early-Stage Layout
Production scenario:
A studio needs to create an abandoned industrial warehouse for a video game cinematic. Workflow: 1. An environment artist opens a new Blender scene and logs into Loom. 2. They enter a prompt: “Create a large abandoned industrial warehouse with concrete pillars, broken windows, overhead steel beams, scattered machinery and natural light entering from the roof.” 3. Loom assembles the environment directly in Blender. 4. The artist can move, scale, replace, or delete individual objects. 5. The artist refines the environment using existing studio assets. What the plugin actually does: It generates editable scene geometry, object placement, and lighting rather than simply producing an image.
2. Modelling
Production scenario:
An automotive CGI studio needs several background objects for a commercial featuring a luxury SUV. The environment requires street furniture, concrete barriers, industrial equipment, and roadside objects. Workflow: 1. The artist opens the existing environment in Blender. 2. They upload a reference photograph of a roadside electrical cabinet to Loom. 3. Loom generates a textured 3D model. 4. The mesh appears at the Blender 3D cursor. 5. The artist checks the geometry and adjusts the model as required. 6. The asset is positioned within the environment. What the plugin actually does: Uses Meshy 5 to generate meshes with UVs and materials, including linked PBR textures. The output is editable Blender geometry.
3. Animating & Blocking
Production scenario:
A studio is producing a trailer featuring a soldier entering a room and taking cover. Workflow: 1. An animator opens Blender and logs into Loom. 2. They describe the movement: “A soldier runs forward, slows down, crouches behind a concrete barrier, then looks over his right shoulder.” 3. Loom generates a rigged character animation. 4. The resulting keyframes appear on Blender’s timeline. 5. The animator opens the Graph Editor and refines the animation curves. 6. The animation is incorporated into the shot. What the plugin actually does: Loom generates a fitted, weighted armature with standard Blender bones and editable keyframes. The animation is not simply an AI-generated video. It produces animation data that artists can modify. It reduces the time required to create initial animation blocking. This could be particularly useful for background characters, previs, and rapid animation experimentation.
4. Lighting & Look Development
Production scenario:
An automotive advertising studio needs to present several lighting treatments for a vehicle commercial. The studio already has an approved vehicle model and camera composition. Workflow: 1. The artist loads the vehicle into Blender and logs into Loom. 2. They establish the camera angle and upload a reference image or describe the lighting: “Generate three lighting options. I’ve been given this lighting reference. Set up an initial lighting rig that approximates the direction, colour temperature and relative intensity of the key, fill and rim lighting. Don’t modify existing materials. Then generate two alternative versions approximating dawn and dusk.” 3. The results are visible in the viewport and can be modified by the lighting artist. 4. Once approved, the lighting artist reproduces the selected direction in the production renderer. What the plugin actually does: Loom quickly generates different lighting setups that are immediately renderable or editable by reacting to your prompt or reviewing the uploaded reference image. Depending on the scene, this could involve an HDRI, Blender World lighting, Sun lights, Spot lights, practical lights within the environment, or a combination of these.
5. Rendering
Production scenario:
You need to quickly render a pass for a WIP production meeting and your machine keeps crashing.
Workflow:
1. The artist opens the scene in Blender and logs into Loom.2. They prompt Loom to inspect the current render settings: “Fix the render setting in this scene. Set this scene up for final rendering in Cycles at 4K. Use GPU rendering, configure sensible sampling and denoising, create Cryptomatte for the characters and vehicle, add the standard lighting AOVs, configure multilayer EXR output and flag anything likely to cause excessive render times.”3. The results are visible in the rendered viewport (Rendered mode) to allow the artist to keep tweaking the render, or in Blender's Image Editor as a Render Result. Save your outputted frames as an EXR image sequence ready for hand off to the comp artist.
What the plugin actually does: Loom inspects your render settings programatically and diagnoses scene data to determine the root cause of the issue. For example, it might detect an extremely high polygon count in the geometry, extremely dense volumetric or necessary persistent data.
6. Pitches, Animatics & Previs
Production scenario:
A studio has blocked out a 15-second sequence for a video game trailer. The environment, characters, and camera positions exist in Blender, but the scene is not ready for final rendering. Workflow: 1. The artist opens the existing Blender scene and logs into Loom. 2. They position the camera to establish the composition. 3. They use the Blender viewport as the visual starting point. 5. Export a screen shot and upload to your favourite AI video generator model. 6. The artist reviews the result with the director. 7. The approved direction informs the final CG production. Artists can turn rough 3D compositions into more visually developed moving images without completing the entire rendering pipeline.
Production scenario:
A studio needs to create an abandoned industrial warehouse for a video game cinematic. Workflow: 1. An environment artist opens a new Blender scene and logs into Loom. 2. They enter a prompt: “Create a large abandoned industrial warehouse with concrete pillars, broken windows, overhead steel beams, scattered machinery and natural light entering from the roof.” 3. Loom assembles the environment directly in Blender. 4. The artist can move, scale, replace, or delete individual objects. 5. The artist refines the environment using existing studio assets. What the plugin actually does: It generates editable scene geometry, object placement, and lighting rather than simply producing an image.
2. Modelling
Production scenario:
An automotive CGI studio needs several background objects for a commercial featuring a luxury SUV. The environment requires street furniture, concrete barriers, industrial equipment, and roadside objects. Workflow: 1. The artist opens the existing environment in Blender. 2. They upload a reference photograph of a roadside electrical cabinet to Loom. 3. Loom generates a textured 3D model. 4. The mesh appears at the Blender 3D cursor. 5. The artist checks the geometry and adjusts the model as required. 6. The asset is positioned within the environment. What the plugin actually does: Uses Meshy 5 to generate meshes with UVs and materials, including linked PBR textures. The output is editable Blender geometry.
3. Animating & Blocking
Production scenario:
A studio is producing a trailer featuring a soldier entering a room and taking cover. Workflow: 1. An animator opens Blender and logs into Loom. 2. They describe the movement: “A soldier runs forward, slows down, crouches behind a concrete barrier, then looks over his right shoulder.” 3. Loom generates a rigged character animation. 4. The resulting keyframes appear on Blender’s timeline. 5. The animator opens the Graph Editor and refines the animation curves. 6. The animation is incorporated into the shot. What the plugin actually does: Loom generates a fitted, weighted armature with standard Blender bones and editable keyframes. The animation is not simply an AI-generated video. It produces animation data that artists can modify. It reduces the time required to create initial animation blocking. This could be particularly useful for background characters, previs, and rapid animation experimentation.
4. Lighting & Look Development
Production scenario:
An automotive advertising studio needs to present several lighting treatments for a vehicle commercial. The studio already has an approved vehicle model and camera composition. Workflow: 1. The artist loads the vehicle into Blender and logs into Loom. 2. They establish the camera angle and upload a reference image or describe the lighting: “Generate three lighting options. I’ve been given this lighting reference. Set up an initial lighting rig that approximates the direction, colour temperature and relative intensity of the key, fill and rim lighting. Don’t modify existing materials. Then generate two alternative versions approximating dawn and dusk.” 3. The results are visible in the viewport and can be modified by the lighting artist. 4. Once approved, the lighting artist reproduces the selected direction in the production renderer. What the plugin actually does: Loom quickly generates different lighting setups that are immediately renderable or editable by reacting to your prompt or reviewing the uploaded reference image. Depending on the scene, this could involve an HDRI, Blender World lighting, Sun lights, Spot lights, practical lights within the environment, or a combination of these.
5. Rendering
Production scenario:
You need to quickly render a pass for a WIP production meeting and your machine keeps crashing.
Workflow:
1. The artist opens the scene in Blender and logs into Loom.2. They prompt Loom to inspect the current render settings: “Fix the render setting in this scene. Set this scene up for final rendering in Cycles at 4K. Use GPU rendering, configure sensible sampling and denoising, create Cryptomatte for the characters and vehicle, add the standard lighting AOVs, configure multilayer EXR output and flag anything likely to cause excessive render times.”3. The results are visible in the rendered viewport (Rendered mode) to allow the artist to keep tweaking the render, or in Blender's Image Editor as a Render Result. Save your outputted frames as an EXR image sequence ready for hand off to the comp artist.
What the plugin actually does: Loom inspects your render settings programatically and diagnoses scene data to determine the root cause of the issue. For example, it might detect an extremely high polygon count in the geometry, extremely dense volumetric or necessary persistent data.
6. Pitches, Animatics & Previs
Production scenario:
A studio has blocked out a 15-second sequence for a video game trailer. The environment, characters, and camera positions exist in Blender, but the scene is not ready for final rendering. Workflow: 1. The artist opens the existing Blender scene and logs into Loom. 2. They position the camera to establish the composition. 3. They use the Blender viewport as the visual starting point. 5. Export a screen shot and upload to your favourite AI video generator model. 6. The artist reviews the result with the director. 7. The approved direction informs the final CG production. Artists can turn rough 3D compositions into more visually developed moving images without completing the entire rendering pipeline.
Get Started (Closed Beta)
NOTE: This is an early access version. You may experience sudden crashes of Blender and unexpected changes to your scene. If using the extension with important project files, we recommend that you create backups first. Looms requires both the Loom add-on for Blender and the Loom app to be installed.
Install the Loom Add-On for BlenderStep 1. Create a Serra account by emailing hello@serra.tech. In order to use Loom, you'll need a positive credit balance. Contact the Serra team to grant you an initial test credit.
Step 2. Download the Loom extension for Windows (x86) here [integrity check: SHA-256]
Step 3. Start Blender.
Step 4. Open the add-on preferences under Edit -> Preferences... -> Add-Ons.
Step 5. Select the downloadable file and click the Install from Disk button.
Step 6. Close the preferences window.
Step 7. Press n to open the sidebar and select the Assist tab. If signed out, click the "Sign in" button. This will open your default web browser. Complete the sign-up process to create an account or the sign-in process to log into an existing account.
Install the Loom App for WindowsStep 8. Download the Loom app for Windows (x86) here [integrity check: SHA-256]
Step 9. Run the installer. Step 10. Open Blender. In the Loom n-panel in Blender, click the "Continue in" button. This will start the Loom application and hand control over to it.
You're now ready to prompt the AI agent via the Loom chat application and review the AI generated results in the Blender viewport. Keep, refine or undo. Happy creating! Requirements: Blender 4.2 or later on Windows 10 and 11. You need an internet connection and an active Serra account to generate. AI generation runs in the cloud, so a powerful GPU is not required for generation, although your hardware still affects local Blender rendering. Files already saved in your project or on disk remain available offline.
Step 3. Start Blender.
Step 4. Open the add-on preferences under Edit -> Preferences... -> Add-Ons.
Step 5. Select the downloadable file and click the Install from Disk button.
Step 6. Close the preferences window.
Step 7. Press n to open the sidebar and select the Assist tab. If signed out, click the "Sign in" button. This will open your default web browser. Complete the sign-up process to create an account or the sign-in process to log into an existing account.
Install the Loom App for WindowsStep 8. Download the Loom app for Windows (x86) here [integrity check: SHA-256]
Step 9. Run the installer. Step 10. Open Blender. In the Loom n-panel in Blender, click the "Continue in" button. This will start the Loom application and hand control over to it.
You're now ready to prompt the AI agent via the Loom chat application and review the AI generated results in the Blender viewport. Keep, refine or undo. Happy creating! Requirements: Blender 4.2 or later on Windows 10 and 11. You need an internet connection and an active Serra account to generate. AI generation runs in the cloud, so a powerful GPU is not required for generation, although your hardware still affects local Blender rendering. Files already saved in your project or on disk remain available offline.
What It Costs
Loom does not require a paid subscription. Pay only for token usage. Your token USD balance is displayed at all times and updates after every AI model interaction.
Frequently Asked Questions
Do I need a powerful GPU to use Serra's Blender Plugin
No. AI generation runs in the cloud, so your GPU doesn't affect it. It still matters for Blender's own local rendering and viewport performance.
Does the plugin work offline?
Not for generating anything new, that needs an internet connection and a signed-in account. Files already saved to your project or disk stay available offline.
What are the minimal requirements?
Currently Loom's Blender add-on is only available on Windows 10 and 11. Loom requires Blender 4.2 or later. An internet connection is needed. Subscribe to our newsletter for product updates including new releases on MAC.
How much does it cost?
There is no monthly subscription fee for using Loom's add-on for Blender. Simply create an account and pay only for the LLM tokens.
Alex JohnsonCreative Director, Animation Studio |
|---|
We’re able to explore creative directions in hours that previously took days. It gives us more freedom to experiment, push ideas further and get to the strongest visual direction much faster. It doesn't replace the artist, but it does reduce the painful time-consuming tasks from their plate so they can focus on creative decisions.” |
Maria SmithCG Supervisor, Animation Studio |
|---|
“It’s completely changed how we approach early-stage scene building. We can go from a creative brief to something tangible in Blender incredibly quickly, then let our artists take over and refine it for production.” |
James LeeSenior 3D Artist, VFX Studio |
|---|
“The biggest win is keeping the creative process inside Blender. Instead of jumping between different AI tools, we can generate ideas, test directions and keep working with the results directly in the scene.” |
Why Choose Loom by Serra?
Checkout some testimonials from VFX and animation professionals.
Serra Technologies Pty Ltd
ABN: 84 702 332 054
Stay up to date with Serra's product development.
Serra Product News